Thursday, May 12, 2011

DIY Bridesmaid or Bridal Jewelry Set

I had such a fun time making these and definitely saved a bundle doing it myself!

Items you will need
1. Crimping beads
2. Wire
3. Scissors
4. Beads
5. Pliers
Crimping Beads (2.99 with 50% off at Hobby Lobby= $1.50)
Different beads- I used four different colors of pearls (8mm rose, salmon, light pink, and grey), flat beads, crystal ball beads, and small clear glass beads.
Wire .46 mm (I doubled the wire for the necklace), scissors, flat nose pliers, round pliers, closing pliers.
Start by measuring and cutting the wire. I double up the wire and left enough to tie it off.
The most difficult part about this product was choosing the pattern. I spaced my beads about 1 inch apart. Star by using the crimping beads and using your closing pliers to close them off.

The finished product. For the necklace I started with the focal point of the necklace, the crystal ball bead. I used two crimping beads to secure it and then worked from there. I went from darkest bead (rose) to the lightest (light pink).
Between the crimping beads, I used the smaller glass beads.
I chose not to use the use the small glass beads with the crystal ball bead. When your finished, take a fastener and attach it to one side and use the loop on the other side. MAKE SURE YOU MEASURE or it will be off.
For the bracelet, I decided to make it a little more elaborate because you don't always see the wrist, unlike the face and ears. I doubled up the pearls (8mm) and used the same pattern as in the necklace. For the center, I used the crystal ball bead, smaller (6mm) with the flat crystal beads in between. Between each bead to space it off, I used the smaller glass beads.
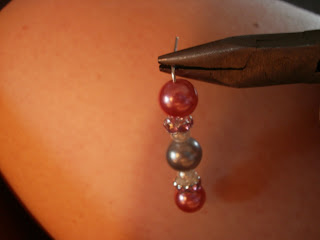
For how to make earrings click here . For the earrings, I use the smaller (6mm) pink pearls, the flat crystal pears in two different sizes (a smaller and a larger), and 8mm grey and salmon pearls.
I thought it would be fun to make myself a pair as well. A lot of women usually wear an heirloom from a mother or grandmother, which I don't have. These turned out pretty, and I'm not sure yet whether I'll commit or not.
Each jewelry set came out to be about $5.00 or less. If you have the time give it a try and save yourself some money!

Wednesday, May 11, 2011

DIY 80'S SKIRT

In the 80's- totally worth watching!80'S TULLE SKIRT- INSPIRATION FROM 80'S DIVA HERSELF CYNDI LAUPER!

Other Inspiration

My golden birthday is coming up and I've decided to make it an 80's party! Instead of spending gobs of money on an outfit, I've decided to make most of it!
DIY 80'S TULLE SKIRT
Items needed:
Neutral Tulle- Black or white
Colored Tulle: I used pink and green
Elastic- 2 inches
Sewing machine
thread
Optional- sequin ribbon

Start by measuring your waist and leaving 2 inches on both sides. Measure the black tulle length and width and cut. Pin the black tulle to the elastic. I ended up doing two layers of black tulle.
Sew down both sides stretching out the elastic as you sew.
Cut off the excess tulle with a pair of scissors.
Cut the black, pink, and green tulle to length in panels. Pin the panels in the desired panel. I pinned the colored tulle every other and then pinned black to the back. Sew down both sides of the elastic.
Hint: Always leave the length longer and then at the end you can cut in to the length. It's always better to have more than less.
Pin the sequined elastic (if desired) to the elastic. Sew down both sides, stretching the elastic as you go.
If you have extra fabric left over, this bow is really easy to make. Take a long strip of tulle and fashion it into a bow. Sew down the middle locking it into place. You can choose to take the colored tulle and stuff it in to both sides. Pin it to the sequined elastic or wear it in your hair.
Use either safety pins to close it, or sew the two ends together. This is the finished product. I ended up taking a lot of tulle out because it was really bulky and I also cut it a lot shorter.
Hint: Don't go too short, or it will look like a tutu. Also, try not to make it look too much like a dance costume.
Finished product with attached bow
How do you like it? With the bow? Or without?

Girls Just Want To Have Fun (in a tulle skirt)
Be on the look out for cutting a t-shirt into an 80's shirt, making neon gloves, and leggings.

Tuesday, May 10, 2011

Just because it has hooks, does not mean it needs to hang!

Instead of hanging up pictures and other wall decorations, try
using other methods, such as leaning in on or against something (book shelf, floor, etc.)
This came out of pure laziness and it works for me.
A picture in my entrance way that leans against the wall.
You an easel to hold a chalkboard (as shown) or a bigger painting, or mirror.
Television easel?

Friday Favorites!


It's Friday! These are a few of my favorite things.....

Julie Andrews- Sound of Music- Favorite Things
My first favorite thing is AVON's Extrahydration Moisturizer
I love this moisturizer and is the first out of many that I've found that actually work and doesn't make my skim break out. Instead of just sitting on the surface, this is actually absorbed into the skin. If you have dry skin like me, or just looking for a new product, give this one a try. If you are fortunate enough to find an avon rep., go that route. However, do not pay $9.99 like I did on Amazon. This typically retails for $3.99

Mac's Smolder Eye Liner
Just because it says Mac, does not mean you have to pay Mac's super high price. It retails for $14.50, but can easily be purchased on eBay for 11.00. This is only about 5 dollars more than the average drug store eye liner but is super black, almost like ink.
Hint: Always go over black eye liner with a black eye shadow and an angled brush.
Neutrogena Acne Stress Control Power
Stress acne is probably the worst acne I get. Not saying I'm stressed, but I do get emotional about somethings. A good cry never hurt anyone, but it does leave me, and probably you too, with a yucky mark). This is a great use for those times. Neutrogena Stress Acne Cleanser has green tea and cucumber that leaves my skim really refreshed. I use this is opposite or my exfoliator, about four times a week.

DIY Bridesmaid Earrings

DIY BRIDESMAID OR BRIDAL EARRINGS

One way to save money on your wedding is making your own bridal jewelry or your bridesmaids jewelry. If you plan on making your bridesmaids wear the same jewelry, do not make them pay for it. Instead purchase the jewelry and give it to them as their gift, or make your own and save anywhere from $50-$150!

Now, I've never made jewelry before, but these had to be the easiest things I've made so far for my wedding. Each pair of earrings came out to be about $0.82 (minus the cost of pliers)! This is a great idea if you just want to make your own earrings!

Hint: If you bridesmaids are wearing the neutral color in your wedding palette, give them a pop of color in their shoes, bouquet, and jewelry. If they are wearing the main color (blue, pink, purple), keep jewelry neutral to white, silver, grey, brass, black, etc.

My inspiration
What you will need

Choose the beads that you would like you bridesmaids to wear. I, personally, like pearls! And I just so
Pink (Salmon Pearls) from eBay- $0.99 and $3.90 shipping and handling from China. 115 beads- about 4 cents per bead.
Grey Pearls 8mm from eBay- $2.80 with free shipping from China. 100 beads- about 2 cents a piece. I only bought off eBay because I couldn't find the correct color at Hobby Lobby.
My bridesmaids are wearing grey, but I chose to incorporate both colors.
Jewelry making kit- $5.99 at Hobby Lobby (I had a 40% off coupon= $3.09) This kit comes with crimping beads, French wire with stoppers and loops, jump rings, fasteners, and head pins (sorry if my lingo is off, remember I'm new at this). Each piece about a penny.
Your three tools- round nose pliers, flat nose pliers, and closing pliers. These are a mini version that I bought at Hobby Lobby for $6.99 with 50% off= $3.50.
Small pearl beads- 200 for $2.99 with 50% off= a penny a piece.
Flat, round beads, Hobby Lobby= 10 for $3.99 with 50% off = 19 cents a piece.
Take a French wire and string on the pattern desired.
Using your pliers, bend the top into a half loop.
Line the loop through a head pin. Wrap the French wire tightly around the head pin, securing the French wire in place. Using pliers, cut off the excess and crimp the remaining wire down.
A smaller pattern for a younger bridesmaid, a simpler earring, or junior bridesmaid.
One pair of earrings- about $.82!!!!

A word of advice.
1. Your flower girls should not be wearing the same jewelry as your bridesmaids. If your little flower girls has her ears pierced, consider a small pair of studs and keep it to that.
2. Try not to make your jewelry too gaudy unless dresses are too simple, that's your style, and your bridesmaids agree.
3. Ask your bridesmaids before hand if their ears are pierced and if they are allergic to anything. I was surprised to find out yesterday that one of my bridesmaid cannot wear earrings because of this. I'm glad I asked :)

Have fun, and get your creative on!

Monday, May 9, 2011

DIY Flower Girl Basket

Flower Girls Basket
Like most wedding items, a flower girl basket can get expensive. A typical flower girl basket retails for approximately $15-$45 and can get even more expensive. Instead of buying one, make one! I ended up making mine for about $3.00.

My Inspiration

Items you will need
Bakset
Fabric (satin)
Needle
Thread
Scissors
Accessories (ribbon, pearls, embellishments, other fabrics)
Step 1
I bought this basket from GoodWill for $.99. Take the fabric (I used a white polyester satin from Hobby Lobby $2.99 with 50% off) and guestimate how much you will need.

Step 2
Gather the fabric into the basket to see how much you need.

Step 3
Cut the fabric (rectangle) and pin up the edges for sewing (or hot gluing like I did)
Step 4
I did this project before I knew how to sew. I used hot glue. I folded the edges over the glue and it worked just as good.
Step 5
Gather the fabric and either sew the piece into the basket or hot glue. Make pleats around the basket that are clean and crisp. Make small stitches (about one every 4 inches) to keep the pleats in place.
Step 6
Stitch up on the handles to secure the sides.
I added 3 pearls to mine.
Step 7
Use ribbon or excess material to cover the handle using hot glue. Since it looked a little weird in the bottom, I stitched in a ribbon flower (it is a flower basket)

I left mine plain for right now. I plan on matching these to the ring bearer's suit because I want the pillow and basket to match. Feel free to add bows, pearls, ribbon, flowers, broaches, etc.

What do you think of dog's as ring bearer's and flower girls?