Showing posts with label wedding. Show all posts

Tuesday, May 10, 2011

DIY Bridesmaid Earrings

DIY BRIDESMAID OR BRIDAL EARRINGS

One way to save money on your wedding is making your own bridal jewelry or your bridesmaids jewelry. If you plan on making your bridesmaids wear the same jewelry, do not make them pay for it. Instead purchase the jewelry and give it to them as their gift, or make your own and save anywhere from $50-$150!

Now, I've never made jewelry before, but these had to be the easiest things I've made so far for my wedding. Each pair of earrings came out to be about $0.82 (minus the cost of pliers)! This is a great idea if you just want to make your own earrings!

Hint: If you bridesmaids are wearing the neutral color in your wedding palette, give them a pop of color in their shoes, bouquet, and jewelry. If they are wearing the main color (blue, pink, purple), keep jewelry neutral to white, silver, grey, brass, black, etc.

My inspiration
What you will need

Choose the beads that you would like you bridesmaids to wear. I, personally, like pearls! And I just so
Pink (Salmon Pearls) from eBay- $0.99 and $3.90 shipping and handling from China. 115 beads- about 4 cents per bead.
Grey Pearls 8mm from eBay- $2.80 with free shipping from China. 100 beads- about 2 cents a piece. I only bought off eBay because I couldn't find the correct color at Hobby Lobby.
My bridesmaids are wearing grey, but I chose to incorporate both colors.
Jewelry making kit- $5.99 at Hobby Lobby (I had a 40% off coupon= $3.09) This kit comes with crimping beads, French wire with stoppers and loops, jump rings, fasteners, and head pins (sorry if my lingo is off, remember I'm new at this). Each piece about a penny.
Your three tools- round nose pliers, flat nose pliers, and closing pliers. These are a mini version that I bought at Hobby Lobby for $6.99 with 50% off= $3.50.
Small pearl beads- 200 for $2.99 with 50% off= a penny a piece.
Flat, round beads, Hobby Lobby= 10 for $3.99 with 50% off = 19 cents a piece.
Take a French wire and string on the pattern desired.
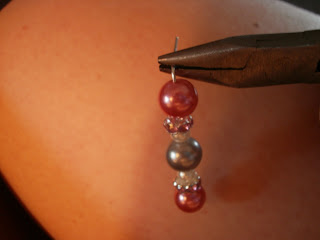
Using your pliers, bend the top into a half loop.
Line the loop through a head pin. Wrap the French wire tightly around the head pin, securing the French wire in place. Using pliers, cut off the excess and crimp the remaining wire down.
A smaller pattern for a younger bridesmaid, a simpler earring, or junior bridesmaid.
One pair of earrings- about $.82!!!!

A word of advice.
1. Your flower girls should not be wearing the same jewelry as your bridesmaids. If your little flower girls has her ears pierced, consider a small pair of studs and keep it to that.
2. Try not to make your jewelry too gaudy unless dresses are too simple, that's your style, and your bridesmaids agree.
3. Ask your bridesmaids before hand if their ears are pierced and if they are allergic to anything. I was surprised to find out yesterday that one of my bridesmaid cannot wear earrings because of this. I'm glad I asked :)

Have fun, and get your creative on!

Monday, May 9, 2011

DIY Flower Girl Basket

Flower Girls Basket
Like most wedding items, a flower girl basket can get expensive. A typical flower girl basket retails for approximately $15-$45 and can get even more expensive. Instead of buying one, make one! I ended up making mine for about $3.00.

My Inspiration

Items you will need
Bakset
Fabric (satin)
Needle
Thread
Scissors
Accessories (ribbon, pearls, embellishments, other fabrics)
Step 1
I bought this basket from GoodWill for $.99. Take the fabric (I used a white polyester satin from Hobby Lobby $2.99 with 50% off) and guestimate how much you will need.

Step 2
Gather the fabric into the basket to see how much you need.

Step 3
Cut the fabric (rectangle) and pin up the edges for sewing (or hot gluing like I did)
Step 4
I did this project before I knew how to sew. I used hot glue. I folded the edges over the glue and it worked just as good.
Step 5
Gather the fabric and either sew the piece into the basket or hot glue. Make pleats around the basket that are clean and crisp. Make small stitches (about one every 4 inches) to keep the pleats in place.
Step 6
Stitch up on the handles to secure the sides.
I added 3 pearls to mine.
Step 7
Use ribbon or excess material to cover the handle using hot glue. Since it looked a little weird in the bottom, I stitched in a ribbon flower (it is a flower basket)

I left mine plain for right now. I plan on matching these to the ring bearer's suit because I want the pillow and basket to match. Feel free to add bows, pearls, ribbon, flowers, broaches, etc.

What do you think of dog's as ring bearer's and flower girls?

Friday, April 29, 2011

DIY Wedding Make-Up and Tips


Wedding Make-Up DIY and my Faves!
Make Up done by Kandee Johnson
Your wedding make-up is almost just as important as your wedding hair!
Wedding Make-Up can take you from your everyday look to instant glam that will look absolutely fabulous in the photos you will cherish for years to come.
Will you do your make-up yourself or have someone else do it for you?

My favorite ever make-up youtube tutorials are done by Kandee Johnson

You can find here blog here
Her family blog here
And her list of products she and I love here
Here tutorials are really easy to follow and although she uses expensive products, she'll give you cheaper, alternative products that are very similar.

Another great alternative to use is Birch Box
Birch Box is a website that sends you 5 different beauty samples for $10 dollars a month. You can cancel at anytime with no consequences. I recently signed up for this myself. They asked me about my beauty likes and then they customize a box according to your tastes. The great thing about this site is that they carry amazing (and expensive) beauty brands such as Nars, Benefit (one of my favorites), Stila, Cargo, and Too Faced (another of my favorites). All products are centered around skincare, makeup, hair, body, face, and lifestyle. So, if you're a beauty-guroo like me but hate spending tons of money on a product that you don't know will work, this might be the thing for you. I've watched many youtube videos of women receiving there birch box and the items inside are valued well over $10. When I get my first one I'll let you know what was in it. I'm also thinking about getting this for mother's day!

To get absolutely free makeup, try Sephora
To find a Sephora Store near you click here
I went into Sephora the other day and asked about "photo ready makeup" that would look flawless in pictures (every brides dream). She recommended me Smash Box foundation, complexion primer, and concealer. She told me that this line was created by two of the grandson's from the man who created Max Factor (movie makeup) and it's supposed to be top of the line when it comes to HD and flawless looking skin.
I asked for some samples and she totally hooked me up. She gave me enough for one to two days, just enough for my engagement photos and it was free! This is a great idea if your planning to do your own make-up.
I wouldn't say to go into Sephora and ask for a million samples at once, but if you live close to a Sephora you could try going in a couple different days. Foundation isn't the only sample you can ask for, you can also get eye shadow, cleanser, blush, eye primer, and even fragrances.
Hint: If you have light or fair skin, like me, then the green primer is for you. If you have yellow pigmentation in your skim then you would want to use the purple primer.

My Favorite YouTuber's Wedding Makeup Videos
KandeeJohnson

Some of my ULTIMATE favorite makeup products
L'Oreal's Double Extend Tubes Mascara
This is by far the best mascara I've ever used!
How to put mascara on
Curl eyelashes for at least 10 seconds. Immediately apply the white base on the back and fronts of the eye lashes using a zip-zag motion. Make sure all the hairs are completely covered. Let them dry and then apply the black side using the same motion.
Sephora Complexion Corrector
I absolutely love this! I bought it from Sephora when it was on sale for $10. For a cheaper alternative, try Hard Candy's complexion palette for $6-$8 at Wal-mart though I have not used it.
To use this palette, first apply your regular foundation to the entire face (use primer first if you have it). The use the green in this palette to cover up any blemishes or redness (around the nostils and mouth). For blemishes, try using a lip brush to get the entire spot covered. Then use a combination of the light and the tan flash tones to cover the entire eye, under eye, and the rectangle zone under your eyes. Also use to cover the green tint. Use a combination of the lightest flesh tone and the pink to highlight the inner corners of the eyes, down the center of the nose, and and the eyebrow bone. Then use your powder to lock it all in. The before and after of this is completely amazing!
Hint: Whenever you use a liquid base on your face always lock it in with a powder base, ex: foundation and powder, liquid eyeshadow and shadow, cream blush and powder blush.
This is my favorite eyeliner. Unlike the drug store brand, this is the blackest of the black. It's more "inky" then anything. But if your going to fork out the money for it, try eBay for a cheaper alternative (I got mine for $9.00, only a couple more dollars then drug store price).
If you going to apply an eye liner, always lock it it with a black eye shadow, this will keep it from running (use an angled brush).
Hint: if you have a hard time lining the upper rim of your eye, line the bottom heavy and immediately squeeze your eyes tight.

Thursday, April 28, 2011

DIY Wedding Hair


Wedding Hair or Bridal Party Hair

Photo Credit
To follow after this DIY Wedding Make-up!

You may find choosing a wedding hairstyle is the least of your worries when it comes to planning your wedding. I, myself think of this as high priority. A hairstyle should compliment your dress, your wedding hair accessory, and of course your personality.
Steps for finding the perfect hairstyle
1. Will you be wearing a hair accessory (veil, tiara, headband, etc)?
2. What length is your hair?
3. Does your hair look better up or down?
4. Will you do it yourself, or get it professionally done?
After you've asked yourself all these questions start looking at Google or Bing images to see what is come up with. For me I Googled imaged "wedding long hair headband and came up with the perfect style for my wedding hair.

Tips for getting your hair done professionally:
1. GO TO THE SALON A HEAD OF TIME! Always get your hair done before the wedding to see what it will look like so there's no surprises
On the day of prom- I went in to have my hair done, I showed him a picture... after he was finished- I bawled- I hated my hair... don't let this happen to you.
Go to someone you trust and have everything planned down to the last detail!

If you're planning on doing your hair yourself, consider using youtube for great hair tutorials!
Some of my favorite hair tutorialists (?) are

Tips: It's good to use a strong hair spray when do your hair for a special event. I love BigSexyHair Spray(Department Store), and Ion hair spray (Sallys)
It's also good to have one day old dirty hair. If you are like my mom and have super fine hair that gets greasy really easy- try using a dry shampoo like Treseme Dry Shampoo, or try using baby powder to absorb the oil.

Know how to use a bobbypin- instead of just sticking it straight in, stick them up and then push down for that extra hold that won't slip out
For fine or thin hair try using Bed Head's Small Talk

Have fun trying these amazing hair styles!

Wednesday, April 27, 2011

Wedding Garter Tutorial


Hey everyone. This is my first tutorial of a piece I've made for my wedding. The most sexiest piece.
The Garter
The wedding garter is one of the oldest surviving wed
ding traditions still practiced today. In the Dark Ages, the wedding party would accompany the bride and groom to their marital bed. The bridesmaids would then try to toss the grater onto the groom's nose. The first to win is the next said to be married (Read more about the history of Garters) Thank god we don't do that anymore!

Since I really didn't know what the garter was all about,
how many to wear, taking it off, etc. I tried to look up the tradition of it and came across great information. The Wedding Bee has an explanation of when to do the garter toss, and a list of great songs to play during (My favorite was the Pink Panther theme!)

Another question to ask yourself is one or two garters? The Garter Girl answers it here. Personally... I want to keep one for memories.. this garter is usually the bigger and more elaborate of the two. The one that's for tossing is usually the simpler of the two.

I knew the only way to make this by myself was to teach myself how to sew using a sewing machine! I know how to hand sew, but I've never used a sewing machine. I told my mom that I needed to use her sewing machine... and she kind of doubted me that I'd be able to teach myself how to sew! But I did! I used a couple different youtube videos for threading the bobbin and the sewing machine itself.
From what I understand, all sewing machines are pretty much the same. I practiced a little on scrap fabric and then I got to work!
Garter Tutorial by WhitneySews- this was super easy and simple!

The whole point of making a garter myself was to save $$$$$$$$$$$$. If you've shopped at bridal stores, hobbylobby, Mangelsons, you'll find that garters can range from 10-45 dollars. Mine only costs about 6.59. BUT if you have a lot of the supplies already it can be even cheaper. And if you use the supplies for other reasons, it can be even cheaper! Shop around first to see what's on sale... Hobby Lobby usually has a printable 40% off coupon, and always has things on sale.

Supplies
Sewing Machine (thanks mom!)
Thread Colors to match material ($2.59 Hobby Lobby) Check of Wal-Mart for even cheaper!
Material (I used polyester chiffon in pink. $2.99 per yard and used the rest of a different project)
Lace (.59 a yard)
Straight Pins
Elastic (2.99 for 2 yards.. by it by the yard for even cheaper!)
My final product which I will embellish later!


Goof-- I was unsure how to thread the elastic through the satin. I Googled it, and if said to secure a safety pin to the end of the elastic so you'll have something to hold onto... I didn't have a safety pin, so I used a bobby pin :)!

My favorite songs for the garter toss
Cherry Pie- Warrant
Bootylicious- Destiny's Child
Alice with the Glory of Love- Say Anything
Crazy Bitch- BuckCherry

Have fun making your wedding or prom garter!

Pink Panther Theme Song